What Is a Wall-Mounted Filter for Your Shower?
TL;DR:
- A wall-mounted shower filter connects between your shower arm and shower head to improve water quality at the point of use. It reduces chlorine, sediment, and impurities, benefiting skin and hair health through easy DIY installation. Regular cartridge replacements ensure optimal filtration, making it a practical, cost-effective solution for personal care.
If you’ve been researching shower upgrades, you’ve likely come across the term “wall-mounted filter” and wondered exactly what it means. A wall-mounted filter is a filtration device that connects between your shower arm and shower head to treat water before it ever touches your skin. It’s not a full plumbing overhaul, and it’s not complicated. What it is, though, is one of the most practical ways to reduce chlorine, sediment, and other impurities that unfiltered tap water delivers straight to your hair and skin every single day.
Table of Contents
- Key takeaways
- What a wall-mounted filter is and how it works
- Types of wall-mounted filters and what sets them apart
- Benefits of using a wall-mounted shower filter
- Wall filter installation guide and maintenance tips
- Wall-mounted vs. other shower filtration options
- My honest take on wall-mounted shower filters
- Start filtering your shower water with Vitacleanhq
- FAQ
Key takeaways
| Point | Details |
|---|---|
| What it is | A wall-mounted filter sits between your shower arm and shower head to filter water at the point of use. |
| Easy DIY install | Most models require no plumber. You remove the shower head, attach the filter, and reattach the head. |
| Skin and hair benefits | Filtering out chlorine and sediment reduces dryness, scalp irritation, and hair brittleness. |
| Filter maintenance matters | Cartridges need replacing every few months to keep filtration performance at its best. |
| Better than basics | Wall-mounted filters offer more permanent, effective filtration than handheld options at a fraction of whole-house system costs. |
What a wall-mounted filter is and how it works
The term “wall-mounted” can actually mean two slightly different things, and knowing the difference saves you from buying the wrong product. Some people use it to describe a filter that physically mounts to the wall with brackets. Others use it to describe a filter that connects to the wall plumbing supply point, sitting between the shower arm coming out of the wall and the shower head itself. The second definition is far more common for shower filtration, and it’s the one that matters most for your water quality.
In practical terms, a wall-mounted shower filter attaches directly to your existing wall-mounted shower arm. Water flows from the wall supply, passes through the filter cartridge inside the device, and then exits through your shower head as cleaner, treated water. The filter cartridge is where the real work happens. Depending on the media inside, it can reduce chlorine, heavy metals, sediment, and other contaminants that affect how your skin and hair feel after every shower.
Here is what happens inside the filter during a typical shower:
- Water enters the filter housing from the wall supply line
- It passes through one or more filtration media layers (activated carbon, vitamin C, ceramic balls, or a combination)
- Chlorine and other chemicals are neutralized or captured
- Sediment and particulates are physically blocked
- Treated water exits through the shower head at normal pressure
Pro Tip: Check that your shower arm uses standard 1/2-inch NPT threading before purchasing any filter. Most U.S. shower arms do, but non-standard designs may require an adapter for a proper fit.
The DIY-friendly design of modern wall-mounted filters means the entire setup process typically takes under ten minutes with nothing more than a wrench and some plumber’s tape.
Types of wall-mounted filters and what sets them apart
Not all wall-mounted shower filters are built the same way, and the differences go beyond aesthetics. Choosing the right type depends on your water quality concerns, your shower setup, and how much you want to spend upfront versus on ongoing cartridge replacements.
| Feature | Standard models | Premium models |
|---|---|---|
| Materials | Plastic housing | Metal or stainless housing |
| Shower head height | Extends head slightly | Keeps original height |
| Filtration media | Basic activated carbon | Multi-stage (carbon + vitamin C or ceramic) |
| Durability | Moderate | High |
| Price range | Lower upfront cost | Higher upfront, longer lifespan |
Beyond the standard versus premium divide, the filtration media inside the cartridge is what actually determines performance. Here are the most common types you’ll encounter:
- Activated carbon: Absorbs chlorine, chloramines, and volatile organic compounds. Very effective for taste and odor improvement.
- Vitamin C cartridges: Neutralize chlorine and chloramines through a chemical reaction. Particularly popular for sensitive skin because they’re gentle and highly effective.
- Ceramic balls: Improve water structure and can reduce certain heavy metals. Often used in combination with other media for multi-stage filtration.
- KDF (Kinetic Degradation Fluxion) media: Uses a copper-zinc alloy to reduce chlorine, heavy metals, and bacteria through a redox reaction. Common in mid-range to premium models.
One feature worth paying attention to is how the filter sits behind your shower head. Premium designs are built to stay concealed, so your shower looks clean and uncluttered. Metal versus plastic components also affect long-term satisfaction. Metal housings resist cracking and corrosion far better, especially in humid shower environments where plastic can degrade over time.
Benefits of using a wall-mounted shower filter
The benefits of wall-mounted filters go well beyond just “cleaner water.” For anyone dealing with dry skin, brittle hair, scalp irritation, or frequent breakouts, the source of the problem might be sitting right in your shower wall.

Chlorine is added to municipal water as a disinfectant, and it does its job well. The problem is that it doesn’t stop working when it hits your skin. Chlorine strips the natural oils from your skin barrier and disrupts the moisture balance your scalp needs to stay healthy. Filtered shower water directly addresses this by neutralizing chlorine before it reaches you.
Here’s what consistent use of a wall-mounted shower filter can do for your personal care routine:
- Skin hydration: Less chlorine exposure means your skin’s natural oils stay intact, reducing dryness and tightness after showering
- Hair texture: Filtered water leaves hair feeling softer and more manageable because the protein structure in each strand isn’t being repeatedly stripped
- Scalp health: Reduced chemical irritation translates to less flaking, itching, and sensitivity, especially for people with conditions like eczema or psoriasis
- Reduced vapor inhalation: Hot showers turn chlorine into airborne vapor. Filtering at the wall means less inhaled chlorine during every shower
- Color-treated hair protection: Chlorine accelerates color fade. Filtered water helps color last longer between salon visits
Pro Tip: If you have sensitive skin or a diagnosed skin condition, look for filters that use vitamin C as the primary filtration media. Vitamin C neutralizes both chlorine and chloramines, which standard carbon filters sometimes miss.
The skin and hair improvements most people notice aren’t subtle. Many report visible differences within two to three weeks of switching to filtered shower water. For people who have spent money on moisturizers and hair treatments without results, the water itself is often the overlooked variable.
Wall filter installation guide and maintenance tips
Installing a wall-mounted shower filter yourself is genuinely straightforward. You do not need a plumber, and you do not need to touch any pipes inside your wall. Here is a step-by-step process that covers the full installation from start to finish.
- Turn off the water supply to your shower or simply make sure the shower valve is off before you begin.
- Remove your existing shower head by turning it counterclockwise. Use a wrench if it’s tight, and protect the finish with a cloth to avoid scratches.
- Clean the shower arm threads with a dry cloth to remove any old plumber’s tape or mineral buildup.
- Wrap fresh plumber’s tape around the shower arm threads clockwise. Two to three wraps is enough to create a watertight seal.
- Attach the filter housing to the shower arm by threading it on clockwise. Hand-tighten first, then give it a quarter turn with a wrench. Do not overtighten.
- Wrap plumber’s tape on the filter’s output threads, then reattach your shower head to the filter output the same way.
- Turn the water back on slowly and check for leaks at both connection points. A small drip usually means the threads need another quarter turn.
Compatibility with your shower arm is the one area where people run into problems. Non-standard shower arms or unusual thread sizes can prevent a flush fit. Check the product specs before purchasing if you have a rain shower head, a ceiling-mounted arm, or a custom fixture.
Pro Tip: Mark your calendar when you install a new cartridge. Most cartridges last two to three months depending on water hardness and usage frequency. Waiting until you notice reduced flow or discoloration means you’ve already been showering with a compromised filter.
Maintenance is simple. Replacing cartridges on schedule keeps filtration performance consistent. Signs you need a new cartridge include reduced water pressure, a return of chlorine smell, or visible discoloration in the cartridge housing. Some brands offer subscription services that ship replacement cartridges automatically so you never miss a cycle.
Wall-mounted vs. other shower filtration options
Understanding where wall-mounted filters sit among your options helps you make a confident decision rather than a default one.
| Option | Cost | Installation | Coverage | Best for |
|---|---|---|---|---|
| Wall-mounted filter | Low to mid | DIY, under 10 min | Single shower | Most households |
| Handheld filter | Low | DIY, very easy | Single shower | Renters, flexibility |
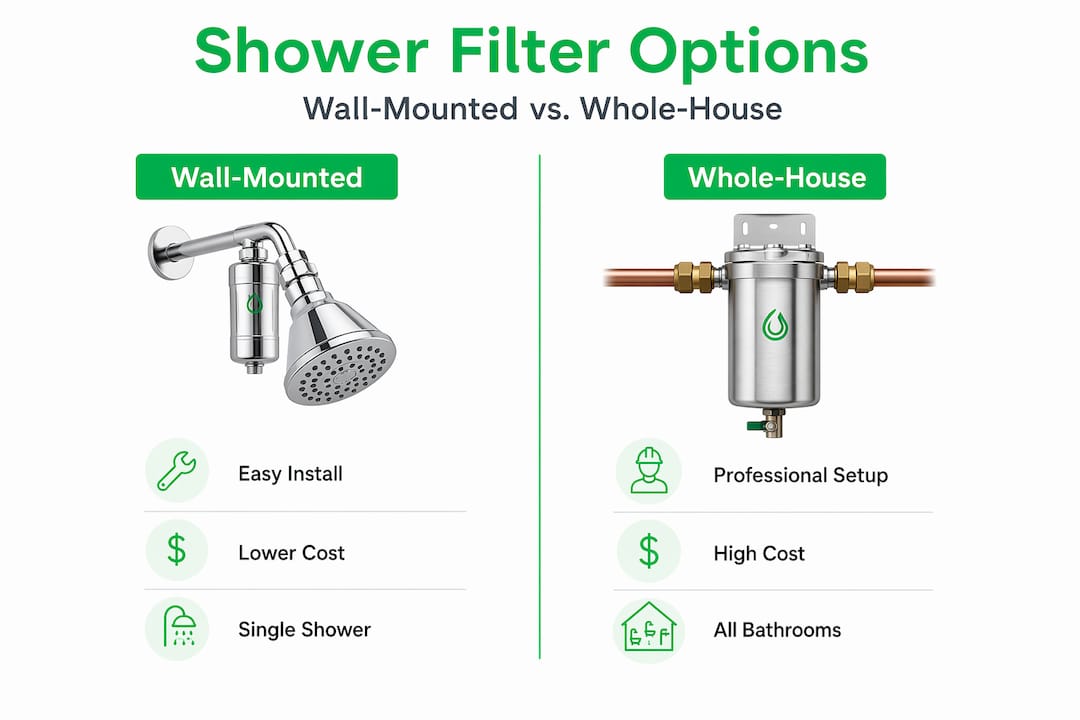
| Whole-house system | High | Professional required | All water in home | Severe water quality issues |
| Inline shower filter | Low to mid | DIY | Single shower | Similar to wall-mounted |
Wall-mounted filters are a practical middle ground between handheld options and whole-house systems. Handheld filters are portable and easy to swap out, but they’re often less durable and more visible. Whole-house systems treat every tap in your home, which is great if your water quality problems are severe, but the installation cost and complexity are significantly higher.
For most people focused on skin and hair health, a wall-mounted filter at the shower is exactly the right scope. You’re treating the water at the point where it matters most for personal care, without overspending on coverage you don’t need.
My honest take on wall-mounted shower filters
I’ve tested and researched shower filtration options for years, and my honest opinion is that wall-mounted filters are underrated. Most people who start researching shower filters get distracted by whole-house systems or flashy shower head combos. What I’ve found is that a well-chosen wall-mounted filter does the job quietly and consistently without requiring you to rethink your entire plumbing setup.
What I’ve noticed from personal experience is that the installation anxiety is almost always worse than the actual process. The first time I installed one, I expected it to take an hour. It took eight minutes. The bigger lesson I learned is that filter cartridge timing matters more than the hardware itself. I skipped a replacement once and noticed my skin felt drier within a week. That’s when I realized how much the filter was actually doing.
The one thing most buyers overlook is the “wall-mounted” terminology confusion. I’ve seen people buy a filter expecting it to mount flat against the tile wall like a bracket, then feel disappointed when it sits at the shower arm connection instead. Understanding what wall-mounted really means in this context saves that frustration entirely.
My advice: prioritize the filtration media over the housing design. A good-looking filter with weak media is just decoration. Vitamin C combined with ceramic or carbon filtration gives you the broadest coverage for skin and hair concerns, and it’s worth the small premium.
— Sara
Start filtering your shower water with Vitacleanhq

If this guide has you ready to act, Vitacleanhq makes it easy to get started without guesswork. The Wall Mount Starter Kit includes everything you need for a clean, DIY installation and delivers noticeably softer water from your very first shower. For ongoing performance, pair it with Vitamin C filter shots that neutralize both chlorine and chloramines, or explore ceramic filter cartridges for multi-stage purification. Vitacleanhq also offers a subscription option so replacement cartridges arrive before you need them. No plumber. No complicated setup. Just cleaner water and healthier skin and hair starting today.
FAQ
What is a wall-mounted shower filter?
A wall-mounted shower filter is a device that connects between your shower arm and shower head to filter water before it exits the shower head. It removes chlorine, sediment, and other impurities at the point of use.
How does a wall-mounted filter work?
Water flows from your wall supply line into the filter housing, passes through a filtration media cartridge (such as activated carbon or vitamin C), and exits as treated water through your shower head. The entire process happens in seconds with no impact on water pressure.
Can a wall-mounted filter improve skin and hair health?
Yes. By reducing chlorine and sediment, a wall-mounted filter helps preserve your skin’s natural moisture barrier and prevents the protein stripping that makes hair feel brittle and dry after showering.
How often do you replace a wall-mounted filter cartridge?
Most cartridges need replacing every two to three months, depending on your water hardness and how frequently you shower. Reduced water pressure or a return of chlorine smell are clear signs it’s time for a new cartridge.
Are wall-mounted shower filters easy to install?
Most wall-mounted shower filters are designed for DIY installation. The process involves removing your shower head, attaching the filter to the shower arm, and reattaching the shower head. It typically takes under ten minutes with basic tools.