
Shower Arm Compatibility in Filters: 2026 Guide
TL;DR:
- Shower arm compatibility is essential for secure installation and effective water filtration. Most US residential shower arms use ½ inch NPT threads, and matching this size avoids leaks and pressure issues. Proper installation requires cleaning threads, using washers, and avoiding over-tightening to prevent damage and ensure a proper seal.
Shower arm compatibility determines whether a shower filter installs securely and performs effectively with your existing plumbing. The role of shower arm compatibility in filters goes beyond a simple physical fit. It affects leak prevention, water flow, filter lifespan, and whether your filtration system ever works as intended. The industry standard for US residential shower arms is a ½ inch (21–22mm) thread diameter, and most filters from Vitacleanhq are built around this specification. Get the match wrong and you face drips, pressure loss, or a filter that needs replacing far sooner than it should.
What are standard shower arm dimensions for filter compatibility?
Thread fit is the foundation of shower arm filter compatibility. Standard thread diameter in US homes is ½ inch (21–22mm), and the vast majority of inline shower filters are designed to connect at this size. Knowing this number before you buy a filter saves you from a frustrating return trip to the hardware store.
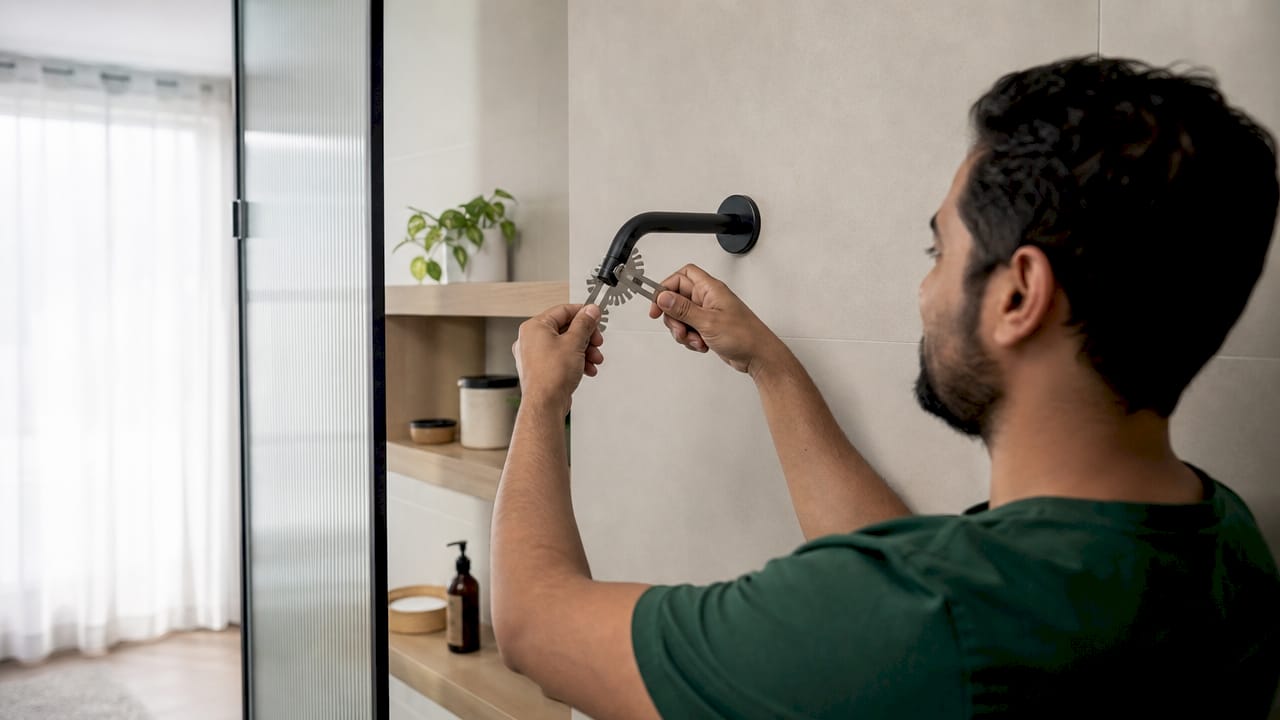
US shower arms use NPT (National Pipe Taper) threads as the standard. Some imported or older arms use BSP (British Standard Pipe) threads, which have a slightly different pitch and angle. The two thread types look nearly identical but do not seal reliably with each other. Measuring thread diameter externally before purchasing any filter is the single most reliable way to confirm compatibility.
Male threads project outward from the arm. Female threads receive the connection inside the filter housing. Most shower arms end in a male thread, and most filters have a female inlet. Understanding which end is which prevents you from buying an adapter you do not need.
| Thread size | Diameter | Common use | Compatibility note |
|---|---|---|---|
| ½ inch NPT | 21–22mm | US residential standard | Compatible with most inline filters |
| ¾ inch | 26–27mm | Older or commercial installs | Requires adapter or professional fitting |
| Metric M24 | 24mm | Imported European fixtures | May need metric-to-NPT adapter |
| BSP ½ inch | 21–22mm | UK and imported arms | Different thread pitch; not NPT compatible |
Non-standard sizes are not rare. Homes built before 1980, properties with imported fixtures, and through-the-wall shower mounts often present compatibility issues that a standard filter cannot solve without an adapter. Adapters work well for minor size differences. A ¾ inch arm paired with a ½ inch filter, for example, needs a reducing adapter to create a proper seal. When the thread type itself differs (NPT vs. BSP), a professional plumber is the safer call.
Pro Tip: Use a thread gauge or take a photo of your shower arm threads to a plumbing supply store before buying a filter. Five minutes of checking saves hours of troubleshooting.
How to install a shower filter with proper arm compatibility
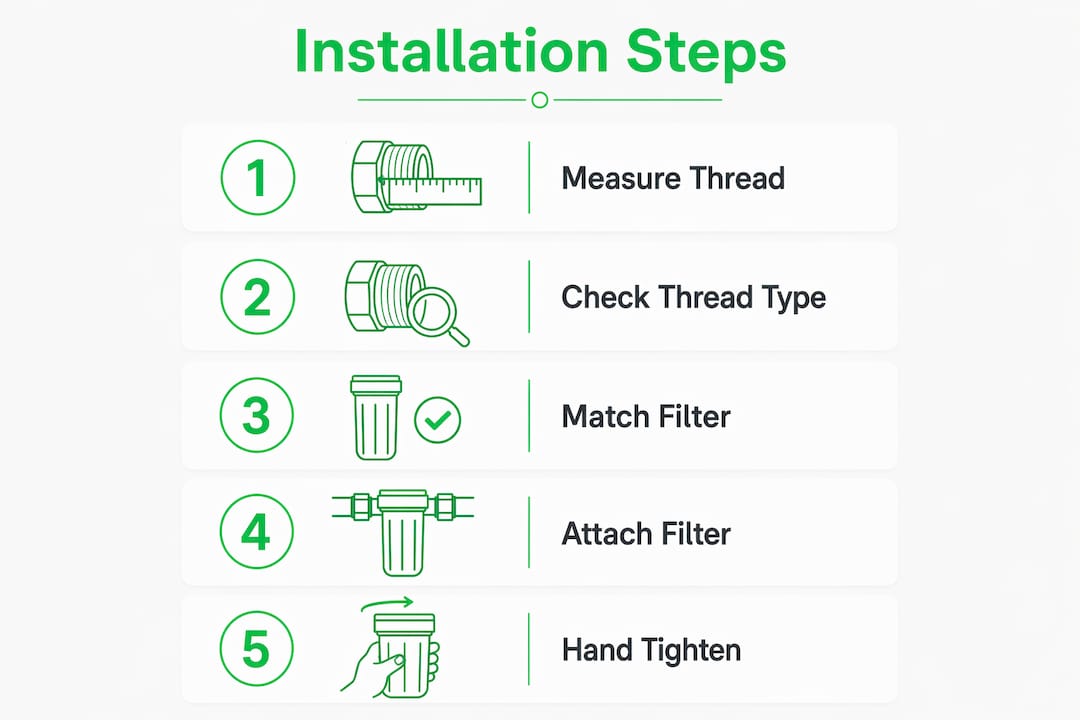
Preparation is the step most homeowners skip, and it is where most leaks begin. Cleaning shower arm threads before installation removes old tape, mineral scale, and debris that block a clean seal. Use a small brush or cloth to wipe the threads clear.
Follow these steps for a leak-free installation:
- Remove the old showerhead. Turn counterclockwise by hand or with a wrench wrapped in a cloth to protect the finish.
- Clean the threads. Strip off any old PTFE tape and wipe away mineral buildup with a damp cloth.
- Inspect the threads. Look for cracks, corrosion, or stripped sections. Damaged threads need professional repair before a filter goes on.
- Apply PTFE (thread seal) tape. Wrap 2–4 layers on the male threads only, winding in the same direction as tightening (clockwise). Applying tape to female threads or using too many wraps distorts the seal and causes leaks.
- Place the rubber washer. Seat the washer inside the filter’s female inlet. This gasket carries most of the sealing load.
- Hand-tighten the filter. Thread it on clockwise for 8–12 full turns until firm. Stop there.
- Attach the showerhead. Connect it to the filter outlet using the same tape and washer method.
- Turn on the water and flush. Run the shower for 60 seconds to clear carbon dust from a new filter. This prevents discolored water on first use.
- Check for leaks. Dry the connections with a cloth and watch for drips for two full minutes.
Over-tightening with a wrench crushes the rubber washer and cracks plastic filter housings. Hand pressure is enough. If a connection still drips after hand-tightening, the problem is almost always a missing or damaged washer, not insufficient force.
Filter orientation matters more than most installation guides admit. Some filters cannot seal properly if mounted sideways or upside down on curved or angled arms. Always check the manufacturer’s instructions for allowable mounting positions before you commit to a placement.
Pro Tip: If your shower arm angles sharply downward or curves to the side, measure the angle before buying a filter. Some inline filters are designed only for near-vertical mounting and will leak in any other position.
What common compatibility problems cause leaks or poor performance?
Most shower filter leaks trace back to one of four causes: wrong thread size, wrong thread type, a damaged or missing washer, or over-tightening. Rubber washers carry the primary sealing load inside the female connection, not the tape. A filter installed without its washer will drip regardless of how much tape you apply.
A less obvious cause is back pressure. Filters add flow resistance to the system. When that resistance combines with a flow restrictor already built into your showerhead, pressure can build at the connection point and push water past an otherwise adequate seal. Homeowners often blame the filter or the tape when the real fix is removing the showerhead’s flow restrictor.
Use this checklist to diagnose a leaking or underperforming filter:
- Check thread engagement. You need at least 3–4 full thread turns engaged for a secure connection. Fewer turns mean the filter is cross-threaded or the sizes do not match.
- Inspect the washer. Remove the filter and look inside the inlet. A flat, cracked, or missing washer is the most common single cause of leaks.
- Examine the tape. Tape should be on the male threads only, wound clockwise, in 2–4 layers. Tape on female threads or more than 4 layers causes bulging that prevents full thread engagement.
- Check filter orientation. A filter mounted sideways on a curved arm may look secure but will fail to seal under water pressure.
- Look for corrosion or mineral scale. Hard water deposits on threads act like grit between mating surfaces and prevent a clean seal.
| Problem | Likely cause | Fix |
|---|---|---|
| Drip at filter inlet | Missing or worn washer | Replace rubber washer |
| Drip despite tight connection | Too much tape or tape on female threads | Remove tape, reapply correctly |
| Filter won’t thread on | Wrong thread size or type | Measure arm, use adapter or call plumber |
| Leak under pressure only | Back pressure from flow restrictor | Remove showerhead restrictor |
| Filter sits at wrong angle | Curved arm incompatible with filter design | Choose a filter rated for that arm angle |
Corrosion and mineral buildup deserve special attention in hard water areas. Scale on threads acts as a physical barrier that prevents full engagement. Soaking the arm end in white vinegar for 20 minutes dissolves most calcium deposits before installation. For persistent leaks after correct tightening, replacing the shower arm itself is sometimes the only lasting fix.
How do you choose the right shower arm and filter for your setup?
Choosing compatible components starts with four measurements: thread size, thread type, arm length, and arm angle. Thread size and type determine whether the filter physically connects. Arm length and angle determine whether the filter hangs correctly and seals under gravity and water pressure.
Lightweight inline filters are the right choice for flexible shower hoses and lightweight handheld arms. Heavy filters stress the connection point and can cause slow thread damage over months of use. Fixed wall-mounted arms handle heavier filter units without issue because the arm itself is rigid and anchored in the wall.
Key compatibility factors to verify before buying:
- Thread size. Confirm ½ inch NPT for standard US arms. Measure externally if you are unsure.
- Thread type. NPT for domestic US fixtures; BSP for many imported or older arms.
- Arm angle. Check whether the filter manufacturer specifies a mounting angle range.
- Filter weight. Match filter weight to arm rigidity. Heavy filters need solid, fixed arms.
- Showerhead type. Fixed, handheld, and rain showerheads all generally accept ½ inch filters, but the physical geometry of rain arms often requires an extension or angled adapter.
- Manufacturer instructions. Non-standard setups always warrant a call to the filter manufacturer or a licensed plumber before purchase.
Vitacleanhq designs its filters around the ½ inch NPT standard, which covers the large majority of US residential shower arms. Each filter ships with a rubber washer and a clear installation guide, removing the guesswork for standard setups. For non-standard arms, the wall-mounted shower filter option provides a more stable mounting point when a standard arm connection is not viable.
Pro Tip: Before ordering any filter, use a tape measure to check the outer diameter of your shower arm’s threaded end. A reading of roughly 21–22mm confirms the ½ inch NPT standard and means any major filter brand will fit.
Key Takeaways
Shower arm compatibility is the single most important factor in whether a filter installs correctly, seals reliably, and delivers clean water without leaks or pressure loss.
| Point | Details |
|---|---|
| Thread size is the first check | US standard is ½ inch (21–22mm) NPT; measure before buying any filter. |
| Washers seal, tape assists | The rubber washer inside the filter inlet carries the primary sealing load. |
| Hand-tighten only | 8–12 turns by hand is enough; wrench force crushes washers and cracks housings. |
| Orientation affects sealing | Some filters only seal correctly in vertical or near-vertical positions; check the manual. |
| Back pressure causes hidden leaks | A showerhead flow restrictor combined with filter resistance can push water past a good seal. |
What I’ve learned from watching homeowners get this wrong
The most common mistake I see is reaching for a wrench before checking the washer. People assume a dripping connection means it needs more force. It almost never does. The drip is almost always a flat washer, a missing washer, or tape wound the wrong way. Tightening harder just makes the problem worse and often cracks the filter housing.
The second mistake is skipping the manufacturer’s orientation guide. A filter designed for vertical mounting will leak on a curved arm no matter how well the threads engage. I have seen homeowners go through two or three filters before realizing the arm itself was the problem. A quick check of the installation sheet before mounting saves that entire cycle of frustration.
Proper compatibility assessment upfront also protects your investment in water quality. A filter that leaks or sits at the wrong angle is not filtering water the way it was designed to. You are paying for clean water and getting a slow drip instead. The filter maintenance practices that extend filter life all depend on a correct installation as the starting point.
My practical advice: spend ten minutes on thread measurement and arm inspection before you order anything. If your setup is non-standard, call a plumber for the arm replacement and then install the filter yourself. That split approach costs less than a full professional job and far less than replacing a damaged filter housing.
— Sara
Vitacleanhq filters built for standard shower arms
Vitacleanhq builds its shower filters around the ½ inch NPT thread standard, which fits the vast majority of US residential shower arms straight out of the box. Every filter ships with a pre-fitted rubber washer and a step-by-step installation guide, so you are not hunting for parts or guessing at torque.

The Vitamin C shower filter shots collection is the most popular starting point for homeowners who want chlorine neutralization with easy filter replacement. For those who want advanced water purity, the ceramic filter range offers the same standard thread connection with an upgraded filtration stage. Handheld options and wall-mounted units cover non-standard arm setups. Vitacleanhq also offers a subscription refill plan so your filter never runs past its service life. If you hit an installation question, the support team is available to walk you through it.
FAQ
What thread size do most shower filters use?
Most shower filters use a ½ inch (21–22mm) NPT thread, which is the US residential standard. Confirm your shower arm matches this size by measuring the outer thread diameter before purchasing.
Why does my shower filter leak even after tightening?
The most common cause is a missing or worn rubber washer inside the filter inlet. Rubber washers carry the primary seal; adding more tape or force without replacing the washer will not stop the drip.
Can I use a shower filter on a curved or angled arm?
Some filters seal correctly on curved arms, but others are designed for vertical mounting only. Check the manufacturer’s instructions for allowable mounting positions before installing on a non-standard arm.
What is the difference between NPT and BSP threads?
NPT (National Pipe Taper) is the US standard; BSP (British Standard Pipe) is common on imported and older fixtures. Both measure roughly ½ inch in diameter but have different thread pitches and angles, so they do not seal reliably with each other without an adapter.
How do I know if my shower arm needs replacing before I install a filter?
Inspect the threads for corrosion, stripping, or heavy mineral scale. If you cannot engage at least 3–4 full thread turns cleanly by hand, the arm threads are too damaged for a reliable filter connection and the arm should be replaced first.